
js补充
Js
1.数组
数组的常用方法
1. map
遍历数组。
1 | var list = ["a", "b", "c", "d", "e"]; |
2. push
在结尾追加元素。
1 | var list = ["a", "b", "c", "d", "e"]; |
3. sort
排序。
*数值:从小到大排序。
字符串:按首字母从 a~z 来排序。
1 | var list = [1, 3, 6, 5, 2]; |
4. filter
过滤器。newList = list.filter(function (item) {}的item是数组的每个元素
例子 - 将数组中大于等于 3 的元素放到新的数组
1 | var list = [1, 3, 6, 5, 2]; |
5. join
连接数组。
不加参数时,默认加逗号。
1 | var list = ["a", "b", "c"]; |
实现 abc,在 join 里面加参数,空字符串可以设成空的连接符
1 | var str = list.join(""); |
实现 a+b+c
1 | var str = list.join("+"); |
6.字符串split 方法
split 是字符串的拆分方法。
split 不设参数时,默认生成一个数组。
1 | var str = "banana"; |
空字符串会拆分字符串
1 | var list = str.split(""); |
按字符来拆分
1 | var list = str.split("n"); //把 n 当成连接符来拆分 |
例子 - 把日期 “2021-8-15” 按 ”-“ 来拆分
1 | var str = "2021-8-15"; |
7.结合数组与对象
1 | var list = [ |
获取数据:list[0].name
1 | //获取数组里第一个对象的年龄 |
例子 - 找出所有男同学,放入一个新的数组。
方法 1 - 数组 filter 过滤器
1 | var list = [ |
方法 2 - 数组 push 添加
1 | var list = [ |
2.Es6
模板字符串
反引号 ``
支持换行。
1
2
3
4let str = `hello
world`;
console.log(str); //hello
// world支持嵌入变量。
${}
连接字符串1
2
3
4
5
6
7let year = "2020";
let month = "10";
let date = "10";
//2020年10月10日
// let result = year + "年" + month + "月" + date + "日";
let result = `${year}年${month}月${date}日`;
console.log(result);
解构赋值
- 数组的解构赋值。
[n,m]
1 | // let n = 10; |
例子 - 交换。让 n=20,m=10。
定义一个临时变量,先把 n 放到 temp 里,再把 m 赋值给 n,最后再把 temp 赋值给 n。- 方法一
1
2
3
4
5
6
7
8let n = 10;
let m = 20;
let temp;
temp = n;
n = m;
m = temp;
console.log(n); // 20
console.log(m); // 10- 方法二(解构赋值)
1
2
3
4
5let n = 10;
let m = 20;
[n, m] = [m, n];
console.log(n); // 20
console.log(m); // 10
对象的结构赋值(常用)。
1
2
3
4
5
6// let name = "xiaoming";
// let age = 10;
let { name, age } = { name: "xiaoming", age: 10 };
// let { age, name } = { name: "xiaoming", age: 10 }; //不会影响数据
console.log(name); // xiaoming
console.log(age); // 101
2
3
4
5
6
7
8
9let xm = { name: "xiaoming", age: 10 };
// function getName(obj) {
// return obj.name;
// }
function getName({ name }) {
return name;
}
let result = getName(xm);
console.log(result);通过解构赋值传递参数。
3.函数
1.闭包
闭包函数:声明在一个函数中的函数,叫做闭包函数。
闭包:内部函数总是可以访问其所在的外部函数中声明的参数和变量,即使在其外部函数被返回之后。
闭包的特性: 内部函数未执行完,外部函数即使执行完成,外部函数中的变量也不会被销毁。
自己总结:在不需要展示内部变量的情况下,调用到内部函数
1 | function fun1() { |
利用闭包实现了代码的封装。
1 | function fun1() { |
代码封装
ES5 的一个模块化的语法。
1 | const module = (function () { |
2.箭头函数
作用: 简化写法。
1 | const add = (x) => { |
1 | const fun = function (x) { |
例子 - 每秒输出一次名字
1 | const cat = { |
使用 function 定义的函数, this 取决于调用的函数。
使用箭头函数, this 取决于函数定义的位置。
箭头函数和普通函数的this 指向不同。
普通函数指向的是调用该函数的对象。
箭头函数:在哪里定义,this 就指向谁。
4.面向对象
ES5 构造函数
构造函数的函数名,首字母大写
构造函数是用来创建对象用的。
function Dog(){}
1 | // 构造函数 |
原型对象
通过设置构造函数的prototype属性,可以扩展构造函数生成的对象。
通过原型对象,为构造函数生成的对象赋予新的方法。
Dog.prototype.sayName = function () {};Array.prototype.sayHello = function () {console.log(你好,我的长度是${this.length}!);}let arr = [1, 2, 3, 4, 5, 1, 2, 3];arr.sayHello();
1 | function Dog(name, age) { |
原型链(继承)
Dog.prototype = new Animal()
1 | function Animal(name) { |
ES6 面向对象语法
Class 关键字
constructor (ES6 的构造函数)
1 | class Dog { |
继承
extends 关键字
super
①
1 | class Animal { |
②
1 | class Animal { |
5.Dom节点
1.设置样式
element.style.color
element.style.backgroundColor
通过 click、mouseenter、mouseleave 事件控制样式。
例子 - 设置 .box 的样式
1 | let divBox = document.querySelector(".box"); |
例子 - 设置 button 的样式
1 | // |
2.设置属性
element.src
element.id
例如
img.src="images/1.png"
点击数字列表切换图片
3.通过 class 属性设置样式
element.className
点击原始、设置激活的背景色
例 1 - 将 h1 元素的类名改成”active”。
HTML 代码
1 | <h1 class="title">hello world</h1> |
JS 代码
1 | let h1 = document.querySelector("h1"); |
例 2 - 点击 h1 时将 h1 的背景色设成红色。
HTML 代码
1 | <h1 class="title">hello world</h1> |
JS 代码
1 | let h1 = document.querySelector("h1"); |
例 3 - 点击 h2 时选中(红色背景色),再点击就取消选中(默认背景色)。
HTML 代码
1 | <h2>hello world</h2> |
JS 代码
1 | let h2List = document.querySelectorAll("h2"); |
4.节点操作
创建元素节点:createElement
创建文本节点:createTextNode
添加节点:appendChild
删除节点:removeChild
例如,制作水果列表的添加与删除。
例 1 - 【增】通过 input 文本框添加 li 元素。
HTML 代码
1 | <input type="text" name="" id="" /> |
JS 代码
1 | let btn = document.querySelector(`button`); |
例 2 - 【删】删除已有的 li 元素。
HTML 代码
1 | <ul class="fruitList"> |
JS 代码
1 | let ul = document.querySelector(`ul`); |
以上内容编写于 2021 年 9 月 5 日 23 点 53 分。
5.事件对象
事件监听函数的形参可以获取事件对象。
通过事件对象可以获取鼠标坐标。
- 获取 x 坐标:
e.clientX; - 获取 y 坐标:
e.clientY;
例 1 - 获取红色方块中鼠标点击的坐标。
HTML 代码
1 | <div class="box"></div> |
CSS 代码
1 | .box { |
JS 代码
1 | let box = document.querySelector(".box"); |
例 2 - 随鼠标显示图片的大图。
HTML 代码
1 | <!-- 小图盒子 --> |
CSS 代码
1 | .smallPicList img { |
JS 代码
1 | // 获取节点 - 小图盒子里所有小图 |
6.事件
1.*事件绑定
addEventListener(“eventType”,function(){})1
2
3
4
5
6
7
8
9
10
11
12
13
14
15<button>按钮</button>
<script>
let btn = document.querySelector("button");
// addEventListener 在同一元素上的同一事件类型添加多个事件,不会被覆盖。
btn.addEventListener("click", function () {
console.log("hello world");
});
btn.addEventListener("click", function () {
console.log("hello script");
});
// 执行结果如下:
// hello world
// hello script
</script>element.onEventType = function(){}1
2
3
4
5
6
7
8
9
10
11
12
13
14<button>按钮</button>
<script>
let btn = document.querySelector("button");
// onEventType 会被下一个同一事件类型的事件覆盖。
btn.onclick = function () {
console.log("hello world");
};
btn.onclick = function () {
console.log("hello script");
};
// 执行结果如下:
// hello script
</script>
两者区别:
addEventListener在同一元素上的同一事件类型添加多个事件,不会被覆盖。addEventListener可以设置元素在捕获阶段触发事件,而onEventType不能。
应用场景:修改别人代码、添加功能的时候用addEventListener会方便很多。
2.事件流
三个 div 嵌套,都绑定 click 事件,点击最内层的元素,事件如何执行。—— (b).
a:只执行最内层
b:从内到外都执行
c:从外到内都执行
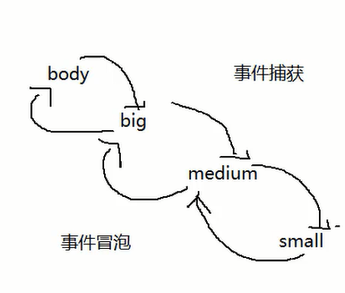
3.事件捕获与事件冒泡
默认情况下,事件会在冒泡阶段执行。
addEventListener(eventType,fun,boolean);
默认 false:冒泡阶段触发,true:捕获阶段触发。
例 1 - 三个 div 嵌套,都绑定 click 事件,点击最内层的元素。
HTML 代码
1 | <div class="big"> |
CSS 代码
1 | .big { |
在事件冒泡阶段触发。
JS 代码
1
2
3
4
5
6
7
8
9
10
11
12
13
14
15
16
17let big = document.querySelector(".big");
let medium = document.querySelector(".medium");
let small = document.querySelector(".small");
big.addEventListener("click", function () {
console.log("Hi,I'm big");
});
medium.addEventListener("click", function () {
console.log("Hi,I'm medium");
});
small.addEventListener("click", function () {
console.log("Hi,I'm small");
});
// 在事件冒泡阶段触发。
// 执行结果如下:
// Hi,I'm small
// Hi,I'm medium
// Hi,I'm big在事件捕获阶段触发。
1
2
3
4
5
6
7
8
9
10
11
12
13
14
15
16
17
18
19
20
21
22
23
24
25
26
27
28
29let big = document.querySelector(".big");
let medium = document.querySelector(".medium");
let small = document.querySelector(".small");
big.addEventListener(
"click",
function () {
console.log("Hi,I'm big");
},
true
);
medium.addEventListener(
"click",
function () {
console.log("Hi,I'm medium");
},
true
);
small.addEventListener(
"click",
function () {
console.log("Hi,I'm small");
},
true
);
// 在事件捕获阶段触发。
// 执行结果如下:
// Hi,I'm big
// Hi,I'm medium
// Hi,I'm small
事件对象扩展
4.阻止事件冒泡
e.stopPropagation();
阻止事件冒泡执行。让外层的事件不被执行。
例 1 - 三个 div 嵌套,都绑定 click 事件,点击最内层的元素。
HTML 代码
1 | <div class="big"> |
CSS 代码
1 | .big { |
JS 代码
1 | let big = document.querySelector(".big"); |
例 2 - 点击一个按钮,显示一个容器盒子。点击容器,容器背景颜色改变。点击容器中的按钮,容器隐藏。
HTML 代码
1 | <button class="show">显示</button> |
CSS 代码
1 | .box { |
JS 代码
1 | let show = document.querySelector(`.show`); |
5.事件默认行为
去掉事件默认行为。
e.preventDefault();return false;
例 1 - 为一个可以跳转到百度的 a 标签设置点击事件。
HTML 代码
1 | <a href="http://www.baidu.com/">baidu</a> |
JS 代码
1 | let a = document.querySelector(`a`); |
以上内容编写于 2021 年 9 月 9 日 01 点 29 分。
6.*事件委托
通过e.target 将子元素的事件委托给父级处理。
例 1 - 实现一个水果列表,让后添加的元素也可以被删除。
HTML 代码
1 | <input type="text" name="" id="" /> |
JS 代码
1 | let btn = document.querySelector("button"); |
7.事件类型
- 鼠标事件
- 键盘事件
- 触屏事件
8.键盘事件
e.keyCode
键盘的每个按键都有绑定的键码。
例如,通过以下代码输出不同按键的键码。
1 | document.onkeydown = function (e) { |
例 1 - 通过上下左右键控制元素移动。
偏移量
| 左偏移量 | 上偏移量 | 右偏移量 | 下偏移量 |
|---|---|---|---|
| offsetLeft | offsetTop | offsetRight | offsetDown |
HTML 代码
1 | <div class="box"></div> |
CSS 代码
1 | .box { |
JS 代码
1 | let box = document.querySelector(`.box`); |
7.计时器
1.setTimeout
例 1 - 2 秒后输出 Hello world 点击停止按钮停止计时器
1 | let timer = null; |
例 2 - 3 秒后跳转到百度
1 | setTimeout(() => { |
2.防抖与节流
解决性能问题,开发中常会遇到。
防抖:对于短时间内多次触发事件的情况,可以使用防抖停止事件持续触发。
节流:防止短时间内多次触发事件的情况,但是间隔事件内,还是需要不断触发。
例如:window.onscroll 事件,input 输入搜索内容(当你一直输入的时候不会自动搜索内容,当你停止输入一会后才会自动搜索)
1.防抖 (debounce)
多次触发事件的时候它一次也不会执行,等事件结束了才会执行。
例如,鼠标滚轮滚动事件不会连续触发
1 | let timer = null; |
2.节流(throttle)
多次触发事件的时候每隔 x 秒会执行一次。
例如,鼠标滚轮滚动的事件按时间间隔触发
1 | let mark = true; |
3.返回顶部效果
window.onscroll事件:滚动条滚动事件
1 | window.onscroll = function() { |
document.documentElement.scrollTop: 页面滚动位置距离顶部距离window.scrollTo(0,0):让页面滚动条返回至顶部。window.scrollTo(0,0)的 x 代表的是横向的滚动条,y 代表的是竖向的滚动条。
8.Bom
1.对象成员
- window 对象 (全局对象)
- screen 对象包含有关用户屏幕的信息
- location 对象用于获得当前页面的地址(URL),并把浏览器重定向到新的页面。
- history 对象包含浏览器的历史。
- navigator 对象包含有关访问者浏览器的信息。
2.window
window 对象是全局对象,所有在浏览器可以直接使用的方法,都是 window 对象的方法。例如:
- 计时器方法
- 弹出框方法
3.弹出框
- alert
- prompt
- confirm
在开发应用当中,一般不使用系统自带的弹出框,移动端可能会被屏蔽。
4.location
location.href- 属性返回当前页面的 URL - “https://www.baidu.com“location.hostname- 主机的域名 -“baidu.com”location.pathname- 当前页面的路径和文件名 “/s”location.port- 端口 - “8080”location.protocol-协议 - “https:”
页面跳转 location.href = "http://www.baidu.com" ;
5.navigator
例如 navigator.userAgent ,可以获取浏览器 UA。它可以应用到切换 PC 移动端布局。